
The infamous kitchen that started the whole thing with this house.
It was the first place I started, but then my ADD-like energy kind of took me to this other project, and then Oh! That needs to be done too! and then But I really want to do that too! Before I knew it I had the house in a mess with a bunch of projects started and none of them finished and my husband was about to string me up.
So the kitchen has been in a state of unfinishedness. (Yes, I know that's not a real word but I like it!) It had been in this wonderful state of limbo for... I don't know... 2 months? Something like that. Yeah, I know... Pathetic. Anyway I started on it only 2 days after we signed the papers buying the house. I began by painting the walls, which was written about here.
But now it is finished! Sort of.
Sort of??? Yes, sort of. We still have things we are going to change, like the floor and adding crown molding and stone to certain areas of the walls. I also want to change out the faucet. But as it is right now it is finished to a presentable phase! So Finished! Sort of. :D
So here is The Great Unveiling!

What a major difference! It changed the entire look completely! And we love it. :) Can you see everything we changed? Some ended up being entirely not planned, but we ended up doing it because we knew we could do it. Let me just say right now that my husband is INCREDIBLE! I mean, look at what this man did! In this renovation he did beadboard backsplashes, some minor plumbing work, and he made me custom countertops! That's right, CUSTOM. He's Mr. Incredible and I'm super proud to call him mine. :)
Now for those who want to know exactly what we did, I will explain in this post I am now dubbing The Longest Blog Post Known to Man post. :D
Here's a larger picture of the Before shot:


The walls stayed like this until the Labor Day Weekend Renovation. Yes, it deserves a title. It was intense and we pushed through it. We took the 4 day weekend and busted our butts!
But before the Labor Day Weekend Renovation I spent the previous month - yes, you read that correctly. MONTH - and painted the cabinet doors. It took a month because I could only work on half of the cabinet doors at a time, so it took twice as long as it should have. I sanded them all down, cleaned them off with a damp cloth, painted one side, let it dry, flip it, paint, dry, flip, paint second coat, dry, flip, second coat on back side, flip.... you get the drift. It was a looooong process. Waiting for it to dry enough to flip was the time consuming part. And, lucky me, we were going through a hot and very humid weather phase, so that made the drying that much slower. I put 3 coats of paint on the doors.
Cabinet doors came down and hardware was removed and placed in a zip lock bag.

Finally I got to see the color for real from what I envisioned for the cabinets!


I was able to get the doors finished a few days before the Labor Day Weekend Renovation. That's when the real work began. We removed everything from the cupboards, threw a tarp over everything piled on the table and closed off the entryways to the hallways and living room. Our living room was piled with our kitchen stuff too. I had to sand the cabinets down and everything was going to get very dusted and messy.


After the sanding:


And now comes the paint! This part was glorious! It was wonderful watching these cabinets being transformed.


Three coats of paint were put on the cabinets, just like the doors. This concluded the first day out of the four day weekend. This is where things went further than we intended. We just couldn't stop here. We woke up the next morning and I talked of how some day I wanted to get rid of those stupid small back-splashes in the kitchen. I didn't think it would be a chore for now, but my husband said: "Well, why wait? Let's rip them out now."
So we did! And oh my gosh, it was so exciting! I've hated those back-splashes forever!


I also took this time to spray paint the hardware black to match the new black chandelier. Silly me, I forgot to get a picture when I was painting the handles. The handles we got for FREE at a yard sale. Score!

It was at this point that my husband really got into it! After the back-splashes were removed he said: "You've put so much hard work into the cabinets. They look so good that they don't go with the counters at all."
Me: "I know, but we really don't have the money for brand new counters. Counters are horribly expensive!"
Paul: "We could figure out something else to make them look better until we can get the counters. Maybe paint them. You're an artist. You could make them look like real granite."
Me: "Maybe."
Paul: "These counters look ugly. Not mention they are all scratched up now. We have to do something about that. And we might as well so it now."
So we hop in the car and run to Home Depot. We looked at the paint kits for counters, but we just didn't like it. Paul remembered a picture I showed him on Pinterest of a kitchen that looked like what I was envisioning. That kitchen had custom made wooden counters and I loved them. He set out for the wood department. We found oak plywood with a thin layer of beautiful oak on top. It was a huge sheet for $50. We went home and he measured the counters, then returned to Home Depot. We bought two sheets of them along with some molding and had them cut down to the right sizes. We also picked up some stain and clear polyurethane. The cheapest counter tops out there are Butcher Blocks at Ikea for about $500. Granite counter top is well into the thousands. Our custom wood counter tops are an amazing $120! Score again!
We got home and I set to work.


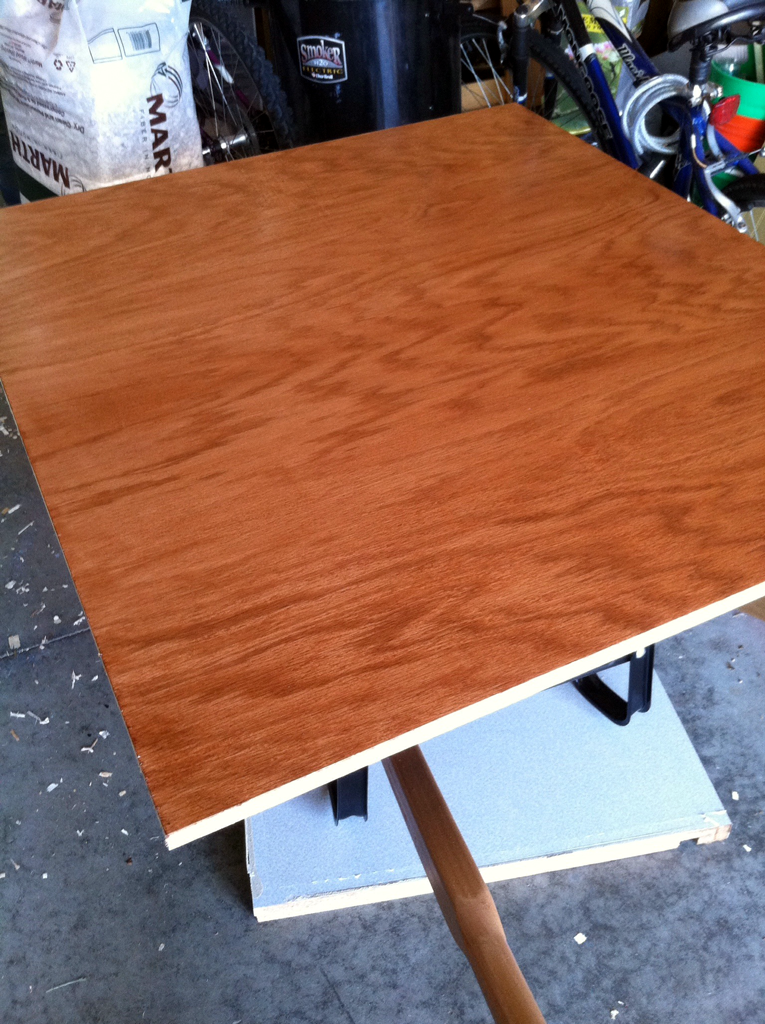

In one of the pieces I found what looked like a tiny paw print! I had to keep it. :)

I am going to stop right here and answer all of the questions I know are popping up in your minds right now. I know these questions are in your mind because I can't even count how many times I've already been asked them. You're thinking:
You know you won't be able to cut anything on them because they'll scratch, right?
This is always the first statement/question asked. Yes, we do know this, but seeing as that is already the case for laminate counter tops (which is what we had to begin with, and which most people have in their homes) this is not a big deal. Most people can NOT cut on counter tops because of scratching. Even on granite. That's why we have cutting boards, people.
What about water??
What about it? I coated these counters with so many coats of polyurethane that when water is on the counters it beads right up. We generally wipe it right up, but I have found where spots were left and they simply just dry. I've seen no damage from it at all. (By the way, polyurethane is safe for food after it is dry. So no worries about that either.)
But how can you prepare food on WOOD? Isn't that not sanitary??
How many times have you rolled out cookie dough or pie crust on your kitchen table, which is almost always made of wood? How many times have you eaten at your wooden table? At least 2 times a day. And guess what? You're still alive! ;) People have been using wooden counter tops for generations before laminate or Formica was ever thought of, and long before granite was made popular.
So now that we have that squared away, let's get back to this post! :D
During the time I was staining and coating the wood for the counters, Paul got to work removing the existing counter tops. The first thing to go was the sink.

It was at this point that we decided that we were going to lower the counters slightly for me. To put it bluntly, I'm short. No way around it. It was just a little bit shorter, where most wouldn't notice it, but it gives the cupboards more clearance and I can tell the difference when I'm cooking because my arms don't get as tired. So out came the plumbing as well. Paul had to shorten the plumbing to go with the shorter counters.
And here those ugly gray counter tops are gone!

While the new wood counters were drying we set to work on the new back-splashes. We were putting up beadboard to cover the walls where a true back-splash should have been. That's why I didn't paint those areas in the kitchen earlier.
.png)
I had painted the beadboard and now it was time to cut the holes for the electrical sockets. To do this we used the tape trick. We put painters tape in the exact size the holes needed to be on the electrical sockets, pressed the beadboard to the wall, pulled it away, and the tape came with it, right where it needed to be. Simple and so easy! Paul started a hole and then used a jigsaw to cut the socket area away.


Once the beadboard was up and the new counters were dry it was time to cut the sink hole. This part had us both very very nervous. Okay, I was more than nervous. I was scared. You only have one shot to get it right. If we screwed this up then that would mean another $50 out the door and another 2 days for staining and clear coating. We did not want to do that again.
We took the old counter top and put it on top of the new one and traced where the counter was to go. This was a lot harder than it sounds. There isn't much room for error. The lip was a very small one, and the sink had these annoying metal pieces that got in the way.
We both looked at eachother and took a deep breath. It's now or never! Paul created a hole and put the jigsaw to work.

After the hole was cut we tried it out by putting the sink in the hole. Thankfully we cut it a bit on the small side. Small is always better than too big when it comes to holes! Paul cut some areas a little more and we sanded the edges and tried the sink again. Ooo-Ra! It fit! We may or may not have Hi-Fived. ;)
All that was left was installing the new counters! It's looking amazing already! At this time we put the cupboard doors back up and then we put the molding on the counters to finish it off.


And the finish!


We couldn't be more happy with the outcome! It was a lot of work, but we are pretty darn proud of ourselves! A couple of DIYers who have never done anything like this before completely tore a kitchen apart and renovated it into something spectacular! My husband is not a master carpenter, but you would never know it seeing our kitchen. We're just two people who knew we could do anything we put our minds to and we did it! Years ago, long before people started thinking we needed "professionals" there were people who took up a hammer, some wood, and a few nails and built their own homes. They cut and put together pieces of wood and hammered a life together. How many times do you hear people say "You can do that??" when it comes to making things.
Yes. We can do that. All of us can do that. We are amazing creations that are capable of doing anything we put our minds to! Don't doubt yourselves. Grab a hammer and see what you can do too!
This concludes The Longest Post Known to Man. :)


